

My granddaughter and I made “smelly cookies you can’t eat”, otherwise known as gingerbread dough ornaments. The recipe we used was really easy to work with and didn’t make a huge mess, plus it didn’t stain or stick to anything.
My granddaughter gave them out as gifts at Thanksgiving and we decorated our “tree” with them. They smell wonderful, but make me hungry for gingerbread cookies all day!
Ingredients
Dough
- 2c ground cinnamon
- 2 TBSP ground ginger
- 2 TBSP ground cloves
- 2 TBSP ground allspice
- 2 TBSP ground nutmeg
- 4 TBSP PVC glue (like Elmer’s)
- 2c applesauce
Icing
- 2 egg whites
- pinch of salt
- 2 cups powdered sugar
- 1 TBSP corn syrup
Stuff for decorating, like…
- Candies, whole spices, glitter, sprinkles & ribbon
Instructions
Dough
- Dump all the dough ingredients into a large bowl and use your hands to mix/knead into a smooth(ish) dough. The dough will be a little sticky but that’s ok it. It’s better for it to be a little sticky then to be dry.
- You can use the dough immediately or wrap it up airtight and use it within 48 hours.
- Cut the dough into two halves and with one half at a time, roll the dough out between two pieces of plastic wrap.
- Roll the dough to a thickness between 1/4 and 1/3 of an inch thick. We found that the ones we rolled very thin curled up on the ends when they dried.
- If you intend to hang your cookies, it’s best to make a hole in them before drying them. Unlike real cookies, these do not grow or melt or expand when “baked” so make the hole the size you need it to be.
- Leave the cookies to dry in a warm place for several days OR put them on ungreased baking sheets covered with tinfoil and leave them in a 200f oven for 2 hours and then shut the oven off and open the oven door slightly. Leave the cookies to cool to room temperature before taking them out of the oven.
- IMPORTANT: They’ll stick to the tinfoil a little, but if they are completely dried and cold they’ll come off the tinfoil fairly easily.
Icing
- Whip the egg whites and the salt until soft peaks form.
- Add the sugar a little at a time (a large tablespoon full) and continue whipping until all the sugar is added and then add in the corn syrup.
- The icing should be very thick but still pipeable. If needed, add a little water (not milk!) a tsp at a time until the icing is JUST pipeable.
- Load the icing into a piping bag or ziplock bag and snip a off a little of one of the corners.
- Keep the snipped tip in a wet paper towel when you are not using it.
- Decorate iced cookies within an hour so everything will stick well.
- Dry iced & decorated cookies for at 24 hours in a very warm dry place.
Decorating Tips
- Line baking trays with plastic wrap to save them from any non-edibles you may be decorating with.
- Pipe the icing on nice and thick, there should be plenty of icing.
- You can ice all the cookies in one go, the icing will stay wet enough to grab onto glitter for at least 20 minutes and wet enough for large decorations like M&Ms for at least an hour.
- You shouldn’t cover the hanging holes with icing or decorations, but if you do, just take a toothpick and clear them out. Otherwise, if you try to clear them out after the icing may break off… but hey, you can always glue stuff back on, it’s not like you’re going to eat them!
Makes About 12 to 18 cookies, depending on how thick you roll them
Notes
This is a great project for kids! I didn’t find that the dough stained or stuck or made a huge mess… though it is very clay like and I had to soak my hands in warm soapy water to get all of the dough off them.
You coulds spray these with a clear coat but please keep in mind that some kids may still attempt to eat these, or at least the decorations. As is, they are probably not going to send anyone to the hospital. So, clear coat at your own discretion.
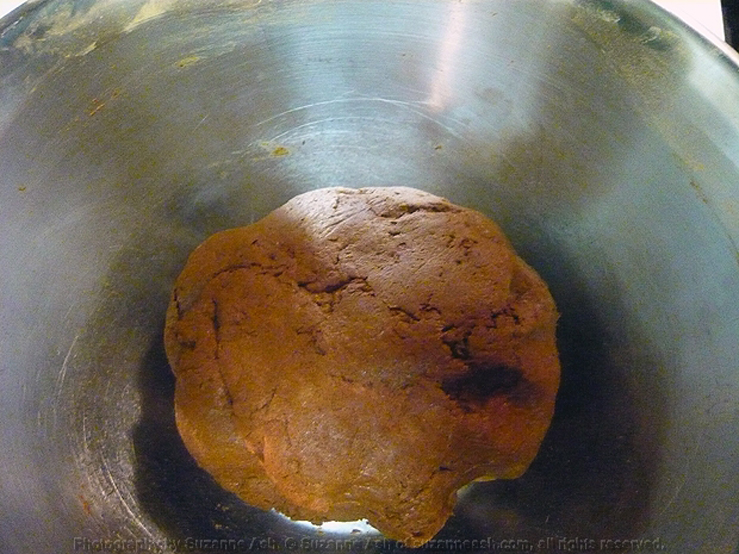
It looked like a lot of dough, but that bowl is massive. It’s hard to tell in the picture.
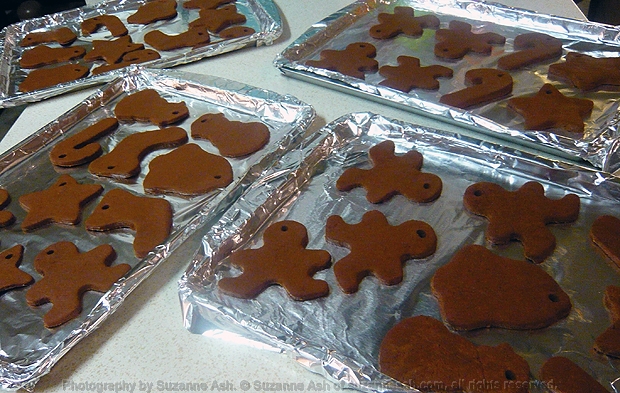
I used small dollar store trays, but since I didn’t have to space them out to much I could fit a dozen onto each.

The thinner cookies sort of turned up on the edges as they dried. If I do this project again I’ll definitely make them thicker.
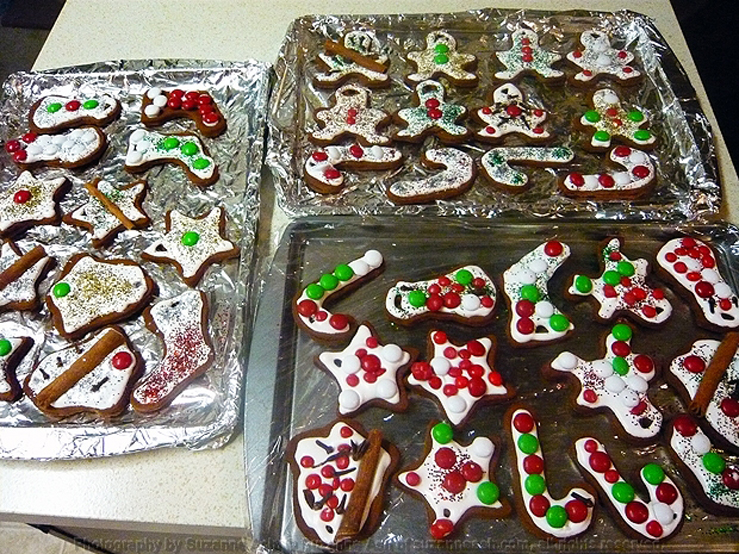
We had a lot of fun decorating them! I put them in my water heater closet overnight and the icing set hard by the morning.
Other Posts You Might Like...
Regardless of the name, this is my interpretation of a dish my mother made for Thanksgiving and ...
I generally buy my granddaughter an Advent Calendar, and it's most usually a crappy $3 one from th...
These beef enchiladas are easy and inexpensive to make, and very filling. Especially if you serv...